


 Photography © Nassima Rothacker
Hungry for recipes guaranteed to feed the family? Channel your frustrations and unique creative skills into something as delicious as Japanese food! Award-winning chef Tim Anderson is here to save the day - he has carefully selected the following three recipes from across his range of Japanese cookbooks to share with you that are not only fun to make but easy to make for however few or many people you're cooking for. Take it away, Tim!
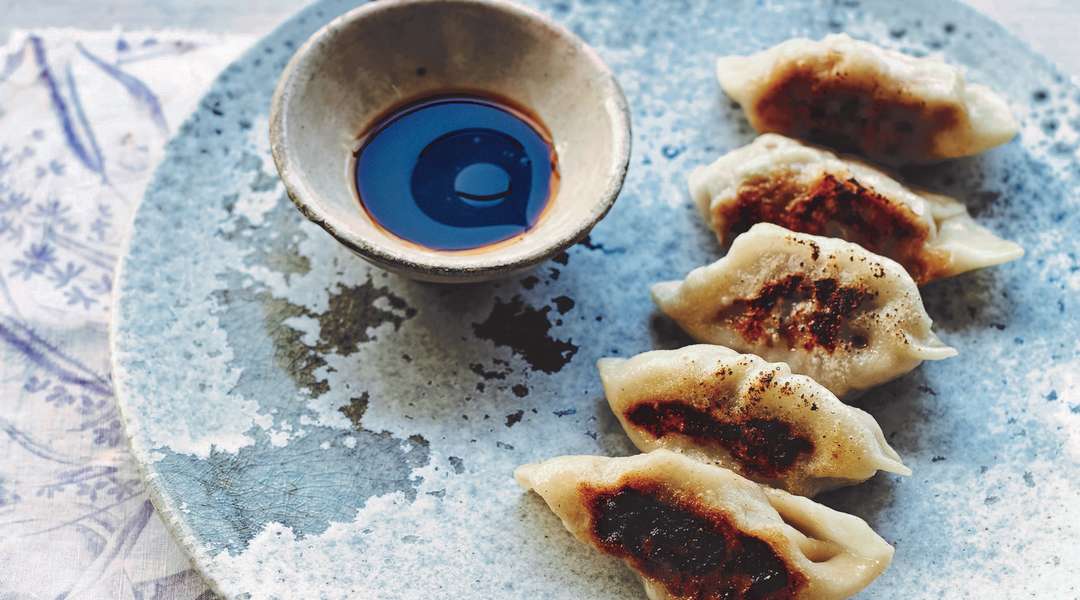
Gyoza
Makes about 40 Gyoza
Distant cousins of ravioli. Long-lost half-brothers of pasties. Grandnephews twice removed of empanadas. Yes, the Japanese gyoza are part of a noble global family of juicy meat encapsulated in a round of folded-over dough. But they are most closely related to - and in fact, largely indistinguishable from - Chinese jiaozi dumplings, specifically guotie: potstickers. The main difference between gyoza and their Chinese ancestor is the thickness of the dough; gyoza wrappers are rolled out to a fine, pasta-like thinness, whereas jiaozi pastry is a bit more substantial. Either way, they are delicious.
Gyoza are fun and easy to make at home, and particularly easy if you can get the wrappers pre-made - they are sold forzen in East Asian supermarkets. Then it's a simple matter of bashing together the filling, assembling and frying. If you can't get the wrappers, it's still not hard, but it will take a little bit more time and effort. Making gyoza is a pleasantly meditative, repetitive task if you make them on your own, but I prefer to make them with a partner. It makes it go faster, and turns it into a fun and sociable experience. At big get-togethers in Japan, it's common to see a group of old ladies sitting around a table, making gyoza and trading gossip.
General Ingredients
Oil, as needed for frying
Soy sauce, vinegar and chilli oil, to serve
Ingredients for the Wrappers
280g (10 oz/generous 2 cups) Plain (all-purpose) flour
1/2 Teaspoon salt
120ml (4fl oz/ . cup) Just-boiled water
Cornflour (cornstarch), for dusting
Ingredients for the Filling
500g (1lb 2oz) Minced (ground) pork - not the lean stuff
1/2 Leek, trimmed and finely diced
2cm (3/4 in) piece of fresh ginger, peeled and very finely chopped
6-10 Garlic cloves (depending on your preference), very finely chopped
3/4 Teaspoon salt
1/2 Teaspoon ground pepper (black is good; white is better)
Method
For the wrappers, sift the flour and salt together into a mixing bowl. Add the boiled water to the flour little by little, incorporating it with a spoon or spatula as you go. When all the water has been added, start working it with your hands; when it all comes together, it should be soft but not at all sticky. Sprinkle some cornflour on the work surface and tip the dough out onto it. Knead for about 10 minutes, until the dough is smooth. If you have a stand mixer with a dough hook, by all means use it, but do use your hands to make sure the dough is nice and soft and dry.
Roll the dough out into two chubby logs, about 3cm (1 1/4 in) in diameter. Wrap each log in cling film (plastic wrap) and leave to rest in the fridge for 30-60 minutes. Unwrap the dough and sprinkle a little more cornflour on your work surface, then cut each log into pieces about 1cm (1/2 in) across - you should get about 20 pieces out of each log.
Use your hands to roll each piece of dough into a little ball, then use a rolling pin dusted with cornflour to roll each ball out into a flat disc. Try to make them very thin, but not so thin that they become difficult to work with - 1mm (1/32 in) thick is a good goal, but 2mm (1/16 in) will be fine. In fact, 3mm (1/10 in) will probably be fine. Just make them as thin as you're comfortable with!
Dust each wrapper with cornflour and stack them up as you go, covering the stack with a clean, damp tea towel to keep them from drying out. Oh, and don't worry if they're not perfect circles - you can still manipulate them into a nice shape when you fill and fold them.
If you're not using them immediately, you can keep them wrapped in cling film in the fridge for about 3 days.
For the filling, mix the minced pork, leek, ginger, garlic, salt and pepper with your hands until everything is well incorporated. That's it.
To Assemble and Cook
First of all, you will need the following things set up: a small spoon; a bowl of water, 1 or 2 baking trays lined with baking parchment and dusted with cornflour; and a non-stick frying pan (skillet) with a lid. Let's make gyoza, or as they say in Japanese, "Gyoza o tsukurimasho!".
1. Lay out about 6 gyoza wrappers at a time on your worktop.
2. Use your small spoon to portion out a little bit of the filling into the centre of each wrapper.
3. Dip a finger in the water, and wet the outside edge of each wrapper.
4. Cup the wrapper in your (clean, dry) hand and fold the wrapper over the filling, pressing in the middle to seal.
5. Press down along one side of the gyoza to seal and to force the air out.
6. Press down along the other side of the gyoza to complete the seal.
7. Fold the sealed side over itself 3-5 times to form an attractive parcel (NOTE: gyoza need not be attractive to be delicious!).
8. Lay the gyoza in rows on your lined trays.
9. Repeat until all the filling or wrappers are gone. (You are a gyoza master if you ration both perfectly - but if you have extra filling, just make yourself a meatball or two. Go on, you've earned it!). Now the fun part: cooking. Gyoza cook in two ways simultaneously: frying and steaming. The trick is to get a nice, crispy bottom and a supple, tender top.
Heat a little bit of oil (1 tablespoon or so) in your non-stick pan over a medium heat. Add the gyoza in rows or a circular pattern and fry until the bottoms are golden brown - it should take about 3-5 minutes. Without turning the gyoza, add about 50ml (2fl oz) water to the pan and put the lid on. Let them steam for 5 minutes or so, until they're cooked through and most of the water has evaporated.
(How to tell if they're cooked through: give them a little prod on their tops. If they feel firm, they're cooked. And if you've made really beautifully thin wrappers, then you may be able to actually see through them; the meat will go from pink to pale grey when it's cooked). Let the remaining water evaporate from the pan to ensure crispy bottoms. When they're done, carefully lift them from the pan with a spatula, or turn them out directly onto a big, flat plate. Serve with a little bit of soy sauce, vinegar and perhaps (definitely!) chilli oil for dippin'.
Oh, and by the way: in Japan it is against the law to enjoy gyoza without beer. That's how well they go together.
Extract from 'Japaneasy' by Tim Anderson (Hardie Grant, hardbook and eBook).
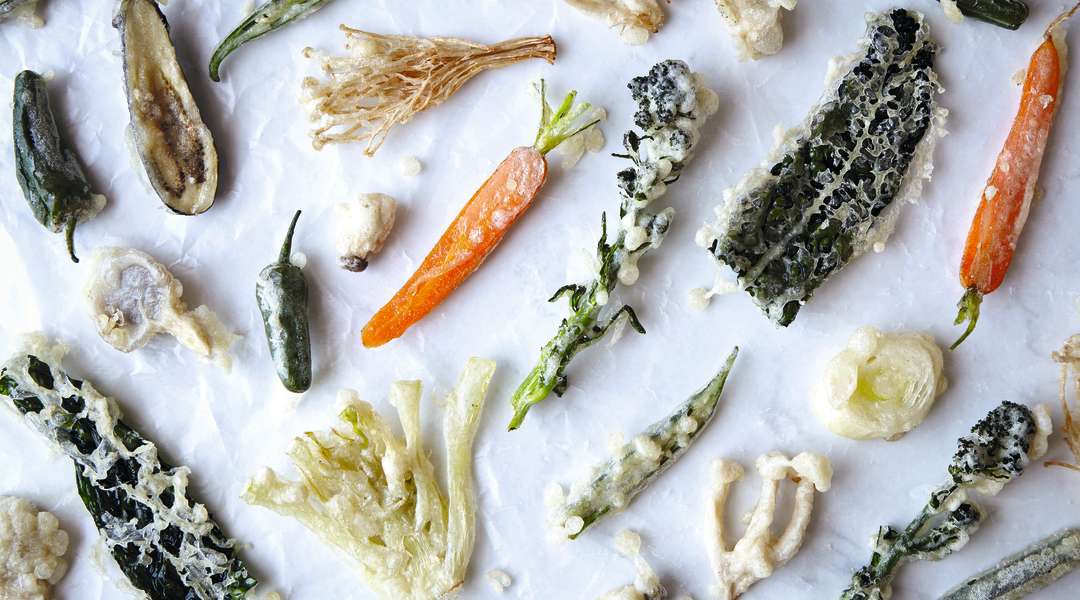
Vegetable Tempura
Serves 4 people
 Photography © Nassima Rothacker
Tempura is one of the greatest ways to cook vegetables in the world, and that goes for pretty much any vegetable. I mean, deep-frying in batter is always a good idea, but I think it's especially nice with fresh veg - the veg itself is essentially steamed, softening but retaining its flavour, with the light crunch of the batter adding the perfect textural complement. You can tempura-fry just about anything, so instead of putting specific vegetables in the recipe, I've just provided a few different types of vegetables and how to best prepare them for the tempura treatment.
General Ingredients
200g (7oz/ 1 1/2 cups) Plain (all-purpose) flour, plus extra as needed
100g (3 1/2 oz/1 cup) Cornflour (cornstarch)
Pinch of salt
400ml (13fl oz/generous 1. cups) sparkling water
Oil, for deep-frying (about 1.5l/50 fl oz/6. cups, but possibly a little more if you're using a very wide pan). Pour your oil into a big, deep pan - it should be very wide, to accommodate a lot of ingredients, but also deep so the oil doesn't overflow. The oil should be at least 7.5cm (3 in) deep, but it should also come up to no higher than 7.5cm (3 in) below the rim of the pan, to be safe. Set over a medium heat while you make the batter.
100-150ml Tsuyu, Ponzu, or Vegan Japanese Mayo, to serve
To Assemble and Cook
Mix together the flours and salt in a bowl, then pour in the sparkling water. Mix until the batter comes together with a consistency of double (heavy) cream. It should be badly mixed; a slightly lumpy, bubbly batter contains more air and irregularities that will give your tempura a light, lacy structure, and it also develops less gluten, which will help prevent your tempura from turning doughy and soft. I usually use chopsticks rather than a whisk to mix tempura batter to make sure it's not too well combined.
Heat the oil to 170-180°C (340-350°F). If you don't have a thermometer, simply drip a few drops of the batter into the oil to test it: if the batter sinks, it's too cold; if the batter immediately floats and sizzles, it's too hot. What you want is for the batter to sink just below the surface of the oil, then rise up and start to sizzle.
Dredge your veg in the flour and then in the batter, allowing excess to drip off before carefully placing them in the oil. KEY POINT: Many vegetables have little nooks and crannies where the batter gets trapped, like between the branches of broccoli, the hollows of cavolo nero, or the cups of mushrooms. Make sure you let as much batter drip out of these crevices as possible or the tempura will be cakey. Use tongs or chopsticks to separate the veg as they fry so they don't stick together. You'll have to fry the veg in batches - the ideal way to serve and eat this is straight out of the fryer, so if you've got somewhere for people to sit in the kitchen, gather them around and play tempura chef for the night, serving the veg as they're ready. If that's not possible, just keep the tempura in a low oven with the door slightly ajar to let out moisture until it's all ready to serve.
The tempura is done when it is a light golden brown and hard to the touch - use tongs or chopsticks to feel if the batter has firmed up into a nice, crunchy shell before removing from the oil and draining on paper towels.
Serve with tsuyu, ponzu or Japanese mayo to dip on the side.
Mushrooms: Medium-sized mushrooms, such as shiitake, chestnut (cremini) or oyster, can be cooked with basically no preparation. You will probably have to destem shiitake as they tend to be tough, but otherwise they're good to go. Enoki or shimeji are also lovely - they should be broken up into small clusters, still attached at the bottom. If you're using eringi, they should be cut into very thin slices, as they can often be tough even when fully cooked.
Broccoli and friends: If you're using normal broccoli, break it into florets that are a little bigger than bite-size; if they're too big, they may still be raw and tough in the middle. Or, you can just use tenderstem or purple sprouting broccoli, which are the perfect size and shape as they are. Cauliflower works well, too, and I especially like romanesco.
Carrots, sweet potatoes and squash: This gang needs to be sliced thinly to ensure they soften by the time the batter is crisp - about 1cm (. in) maximum. Some varieties of squash with tender skins, such as kabocha or butternut, don't need to be peeled, as the high heat of frying will soften the skin nicely.
Aubergines (Eggplant): Baby aubergines work best - slice them in half, then make a series of cuts through them on one side, so that you can splay them out into something resembling a badminton shuttlecock. If you're using a big aubergine, just cut into 1cm (. in) slices or wedges.
Asparagus: Asparagus is simply fantastic in tempura; just make sure you discard any woody bits, but also try not to use asparagus that's really thin - it'll become very, very soft.
Sweetcorn: There are three basic ways to do corn as tempura: you can cut it into little wheels, about 2.5cm (1 in) wide; you can cut the ears into eighths, so you have sort-of traingular batons; or you can take the kernels off the cob (or use tinned corn, which is delicious) and do them kakiage-style. Kakiage are essentially fritters; to make them, drop the corn kernels into the batter and scoop them out with a slotted spoon. Let most of the batter drip away before pushing them off the spoon with another spoon, directly into the oil. They'll form little rafts of exquisitely crunchy, sweetcorn goodness.
Cavolo nero: Stripped away from their tough stalks, the leaves of cavolo nero make amazing tempura that are almost 100% crunch. You can use kale as well, but it's hard to drain off excess batter from their leaves, so they often come out cakey.
Onions and leeks: These are essentially glorified onion rings, except they're not rings - onion discs, I guess. Cut onions no more than 7mm (. in) thick, and do the same with leeks, at an angle, so they are sort of parallelogrammatic.
(Bell) Peppers: The best peppers for tempura are Padrons, or the similar (but very hard to find) Japanese shishito - just drop them in batter and fry, no need to prep. But ordinary sweet peppers work well, too, cut into chunks or rings.
Okra: Okra done as tempura is as addictive as chips. Cut them in half lengthways to maximise crunch.
Fennel: This may seem like an odd choice for tempura, given that fennel's aniseedy flavour isn't usually found in Japanese cuisine, but most of that aroma steams away during frying, so you're left with a sweet, toothsome vegetable with only a subtle scent. Slice them thinly (about 5mm/. in maximum) before frying.
There are also, I must warn you, a few vegetables I cannot recommend for tempura:
Spring onions (Scallions): These always seem like such a good idea, but really they don't soften enough during frying to bite through - I always end up pulling the entire onion out of the batter, leaving behind a hollow tempura sheath.
Courgettes (Zucchini): Unless you cut them very thinly and fry them for a very long time, they just have too much water in them - water that continues to seep out after frying, ultimately making the batter from soggy from within.
Tomatoes: Maybe this one's obvious, but unless the tomatoes are really firm, they fall apart in the fryer.
Extract from 'Vegan Japaneasy' by Tim Anderson (Hardie Grant, Hardback and eBook)
Neapolitan Pizza
Makes 4 Pizzas
 Photography © Nassima Rothacker
Tokyo is pizza country. Though it might not appear to be the case at first glance, Tokyoites have embraced pizza in much the same way New Yorkers have, devouring everything from the finest authentic Italian-style pie all the way down to the cheapest, dirtiest slice. Pizza in Tokyo ranges from Domino's-esque mass-produced delivery stuff up to some of the most carefully crafted 'za you'll ever encounter, and the world (including, sometimes grudgingly, the Italians) have taken notice. This is because Tokyo pizzaiolos haven't just perfected their craft; they've taken it a step further, imbuing it with a distinctly Japanese ethos, flavour and identity. For example, at Pizza Studio Tamaki in Higashi-Azabu, chef Tsubasa Tamaki uses Japanese cedar chips to infuse his pizzas with a delicate but evocative whiff of peppery smoke. At Serinkan in Kamimeguro, chef Susumu Kakinuma has pioneered pizzacraft using only Japanese ingredients. And at Savoy in Azabu Juban, they've gone full fusion and put tuna sashimi, mayo and sweetcorn on a pizza.
That may sound like a step too far but, actually, completely bonkers things like that are among the most popular pizzas in Japan. If you have a look at the menu for Pizza La, one of the biggest pizza chains, you'll find all sorts of toppings that would probably make Neapolitan pizzaiolos spit with disgust: mochi, Korean barbecue, teriyaki chicken, mayonnaise and potatoes, to name but a few. And really, there's nothing wrong with that at all, especially if you put them on a proper light-yet-chewy, slightly charred Neapolitan pizza base. Therefore, this recipe is not for a traditional Neapolitan pizza, but features the Japanese twist of shellfish.
Ingredients for the Dough
800g (1lb 12 oz/6 1/2 cups) '00' flour, plus extra for dusting
2g Fresh yeast
450ml (15 3/4 fl oz/scant 2 cups) Water
20g (3/4 oz) Salt
Ingredients for the Toppings
400g (14oz) Tin of tomatoes
300g (10oz) Fior de latte, cut into small pieces
100g (3 1/2 oz) Squid, cut into bite-size pieces
100g (3 1/2 oz) Raw prawns (shrimp), peeled and devined
100g (3 1/2 oz) Crab meat (white or 50/50 white and dark)
Zest of 1/2 lemon
Red chilli flakes (optional)
16-20 Basil leaves
Good olive oil
Method
To make the dough, place the flour in a deep bowl and form a well in the centre. Dissolve the yeast in the water, then pour into the well. Begin to mix the dough by pushing the flour into the liquid. When it starts to thicken, add the salt and continue to mix until it comes together. Tip the dough out onto a lightly floured surface and knead for 10-15 minutes. Leave to rest for 10 minutes, then knead it a few more times. Shape the dough into a ball, then divide into 4 equal portions. Roll these into balls and place onto a large tray, cover with cling film (plastic wrap) and leave to prove overnight.
Blitz the tomatoes in a blender until pureed but not too smooth. Roll or spread out the dough balls to about 25cm (10 in) in diameter. Heat a non-stick, ovenproof frying pan (skillet) over a medium-high heat and preheat the grill to high. Lay the pizza bases, one at a time, in the hot pan and cook for about 1 minute; while it's cooking, spread the tomato puree on top, leaving about 2.5cm (1 in) uncovered along the outside, then scatter the cheese, squid, prawns and crab around the top. Transfer to the top rack of the oven and grill for another 2-3 minutes until the cheese has melted and the crust has cooked through and begun to blacken in spots. Garnish with a little freshly grated lemon zest, chilli flakes, basil leaves and a drizzle of olive oil.
Extract from 'Tokyo Stories' by Tim Anderson (Hardie Grant, Hardback and eBook)
Tim capitalised on his passion for food when he won MasterChef back in 2011 and he hasn't looked back since. His American heritage and his long-held love for regional Japanese cooking - currently more than ever, particularly with regards to Hokkaidan cuisine - as well as a passion for food science and modernist cuisine have added extra dimensions of unique flare and creativity to his dishes. Aside from featuring as a regular presenter on Jamie Oliver’s Food Tube and Drinks Tube, as well as a staple of the Radio 4 food panel show The Kitchen Cabinet, Tim has published a number of his own cookbooks, including Nanban: Japanese Soul Food, exploring various elements of Japanese cuisine he holds dearest. His proudest moment is the opening of his acclaimed restaurant of the same name, Nanban, in the heart of Brixton, South London.
To stay up to date with all the latest happenings in Japan follow us on Facebook or Twitter.